 iSiloX
home |
support
convert a text document from
your local hard drive
Converting content from your local hard drive is one of the things
you will likely do frequently with iSiloX. This tutorial shows
you how to convert the README text file included in the
iSiloX installation into a document in iSilo™ format.
Step 1:
In iSiloX, to convert content to a document in
iSilo™ format, you need to tell iSiloX
how to create the document. To start doing so, right-click
in the iSiloX document list window. Then click Add
in the context menu that you get.
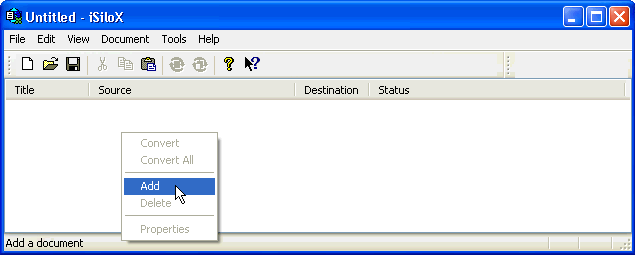
This begins the process of adding a document entry to the
document list. A document entry provides information to iSiloX
on how to create a document.
Step 2:
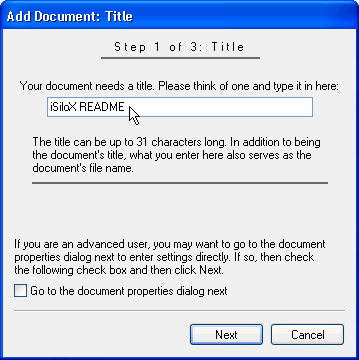
The first necessary piece of information you need to provide
is the title you want to give the document. The title must
be unique among the documents that you create and use
because if two documents do not have unique titles, one will
overwrite the other.
Enter the title in this dialog and then click Next
to proceed to the next step.
Step 3:
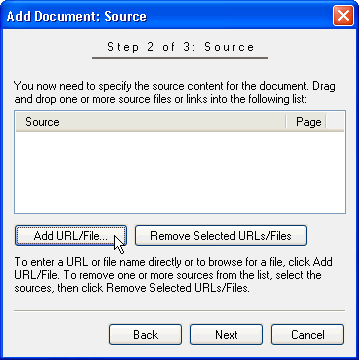
The second necessary piece of information you need to provide
is the source of the content for the document. The dialog
shown here allows you to actually specify more than one source,
but you will be adding the path to the README file as the only
source.
Click Add URL/File so that you can choose the
README file.
Step 4:
In the Add URL/File dialog, click on Browse to navigate
to the location of the README file, which if you allowed the
installation program to install iSiloX to the default location,
will be in the C:\Program Files\iSilo\iSiloX folder.
After you click OK, you will see the path to the
README file listed as a source.
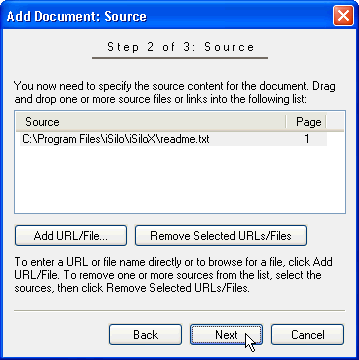
Click Next to continue to the next step.
Step 5:
The third necessary piece of information you need to provide
is the location where you want the converted document to go.
To have the document automatically installed to your device
the next time you HotSync® after converting the document,
select your user name from the HotSync® user name list
in this dialog. This is shown in the first image below.
Alternatively, if you connect through ActiveSync®,
select the correct ActiveSync® name, as shown in
the second image below.
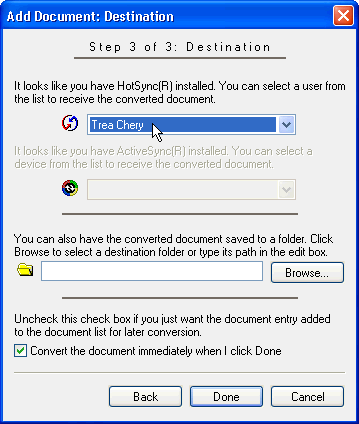

By default, the option Convert the document immediately when
I click Done is checked. When you click Done, iSiloX
immediately converts the README.TXT file into
a document. If the option to convert immediately is not checked,
iSiloX only adds an entry for the document to the document list
without performing the conversion. In this latter case, you can
manually start the conversion.
Click Done to start the conversion.
Step 6:
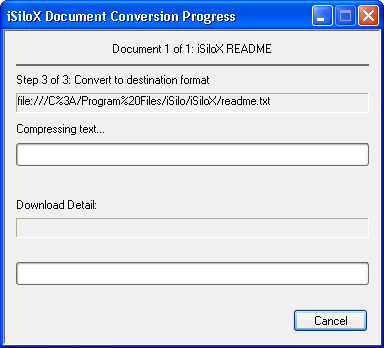
iSiloX begins converting the file and shows the progress of the
conversion.
Step 7:
After iSiloX is done with the conversion, it should give you
a message box informing you that the conversion was successful.
Click OK to dismiss the message box.
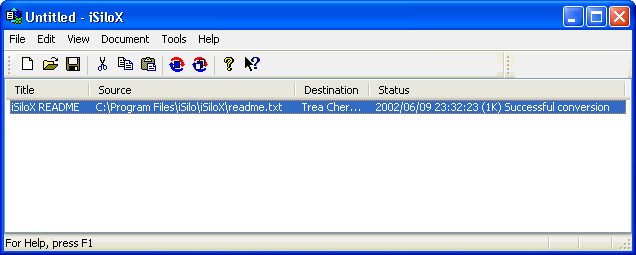
When you dismiss
the message box, you return to the document list, where you see
that iSiloX has added an entry to the document list with the
title, source, and destination information that you specified.
In addition, the Status column shows the date and time at
which the conversion finished as well as the size of the
resulting document and the message "Successful conversion"
to tell you that the last conversion completed succesfully.
Congratulations on having created a document based on content
from your hard drive. If you have not yet done so, see
Convert an HTML Document from the Web for a tutorial
on creating a document based on content from the Web.
©1999-2017 DC & Co. All rights reserved.


